Friday, December 25, 2015
Seasons Greetings
Hi, everybody. I just wanted to wish everybody a happy holiday season. No matter which holidays you might observe, most folks have one at this time every year. I hope the holidays find you and yours happy, safe and prosperous.
Tuesday, December 15, 2015
Must-have tools/ various useful things
One thing that is useful and doesn't typically come with a lot of the sets is a 15/16 socket. That is the socket that you need to remove that big nut that holds the steering wheel on. It is also needed to remove the trunk lock stuff from the trunk lid. And, that is the one that need for that big bolt in the middle of the crank pulley. That bolt is what holds the harmonic balancer on, and, sometimes you need to turn the motor by hand (with a wrench) and that is the bolt that you turn the motor with. A very useful item.
It is also good to have a couple of heavy paper clips sitting around. You need one to remove the lock cylinder from the ignition switch, which has to come out before you can replace the switch. It is also the tool of choice to remove the clips that hold the window crank and door release handle on if you have an earlier 65 or a 64 1/2. It is also useful as a brake light switch by-passer if you are checking your brake light switch. There are lots of things that a correctly configured paper clip does very well.
It is also good to have a couple of heavy paper clips sitting around. You need one to remove the lock cylinder from the ignition switch, which has to come out before you can replace the switch. It is also the tool of choice to remove the clips that hold the window crank and door release handle on if you have an earlier 65 or a 64 1/2. It is also useful as a brake light switch by-passer if you are checking your brake light switch. There are lots of things that a correctly configured paper clip does very well.
Monday, December 14, 2015
Must-have tools/ door panel remover
There are all sorts of things that can go wrong inside one of the doors, and fixing it requires removing the door panel. This thing is solid gold when the time comes to go inside the door of your car. You just stick it between the door and the door panel where the clips are, making sure that the clip is inside the inner fork of the tool, and squeeze. The clip pops right out without tearing up the door panel.


Must-have tools / Volt meter
A question that comes up on a fairly regular basis is "What tools will I need to work on my old Mustang, other than basic hand tools?" So, I'll start posting tools that I have found to be extremely useful, and, at the very top of that list is the volt meter. The electrical systems in these cars were extremely reliable when the cars were new, but, 50 years of "I don't care, just fix it" have caused these poor cars to experience all sorts of electrical weirdness. Plus, there is the simple fact that, after a few decades of reliable service, it is not strange for a component like a headlight switch, turn signal switch, etc... to fail. It is not even possible to over-emphasize how important a volt meter is for tracking down these types of 'issues'.
My volt meter would probably be considered kind of old-school, but, it would have been cutting edge back when these cars were new. I cut the probe ends off of the leads and put alligator clips in their place, which simplified things tremendously. This way, you can just clip the negative lead onto a good ground before you crawl up under the dash.

My volt meter would probably be considered kind of old-school, but, it would have been cutting edge back when these cars were new. I cut the probe ends off of the leads and put alligator clips in their place, which simplified things tremendously. This way, you can just clip the negative lead onto a good ground before you crawl up under the dash.

Monday, August 31, 2015
1965 1966 Mustang gauge Replacement
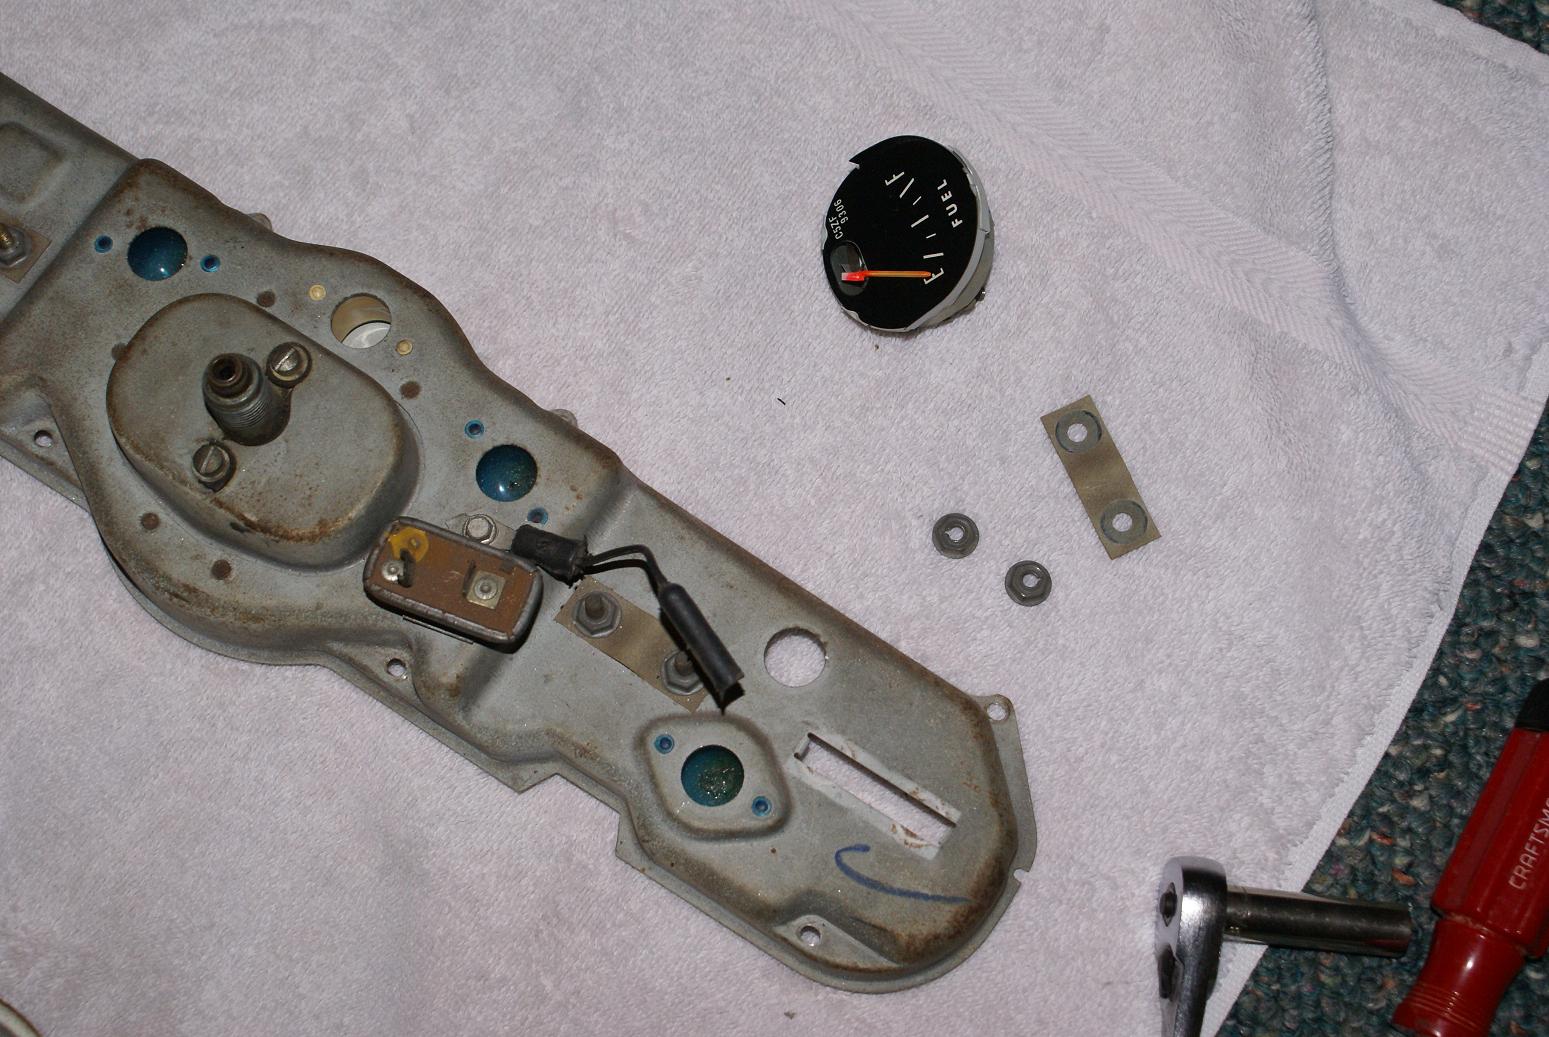
The gauges that Ford used in these cars were so incredibly durable, it is very unlikely that you would ever have to replace one, but, occasionally, you could buy a 65/66 Mustang and then discover that one of the gauges has been damaged somehow and needs to be replaced. Fortunately, this is an extremely easy task to perform successfully. First, you remove the instrument cluster. I did a post on how to do this (also very easy) in a post back in April of '08. Once the instrument cluster is out, put it face down on a soft surface, so that you don't scratch up the instrument bezel, and remove the eight phillips head screws holding the bezel onto the cluster. Then you lift the cluster off of the bezel and put the lens back in the bezel if it falls out. Then lift that black metal thing off of the cluster. You then take a 3/8 wrench and remove the two nuts holding the gauge in place, and save that paper-looking thing that the nuts are holding onto the back of the cluster. Those are extremely important because those are what prevents the gauge from just shorting out on the cluster. The old gauge will now fall out all by itself. You just place the new gauge in the cluster, put the insulator back on, put the nuts back on, making sure you don't crank down on them so hard the nuts cut through the insulator, and reassemble the cluster, black metal thing, bezel and lens. There are a couple of cardboard tubes in there that are also important. Those are what keeps the whole side of the cluster from lighting up and flashing every time you hit the turn signals. There are three little prongs that hold each of those tubes in place while you reassemble everything. It really is just that simple.


Saturday, August 29, 2015
1965 1966 Mustang Seat Belt Warning Light
Here's what the light looks like on the dash, along with a quick sketch of how it's wired. There is a green wire that plugs into the accessory feed, which is behind the instrument cluster. It will be a three prong, female plug. That green wire splits into two green wires, one of which goes to the light on the dash, and the other goes to the switch relay. There will also be a violet colored wire coming out of the light, and it also goes to the switch relay. The relay grounds itself out on the body of the car.


Saturday, August 8, 2015
1965 1966 Mustang Books
A question that seems to come up on a fairly regular basis is "What books can I get that will tell me how my Mustang does the stuff that it's supposed to do, and how can I fix it when it quits doing what it's supposed to?" There are many, many books out there about the 65/66 Mustangs, some better than others. At the top of the must-have list is the appropriate year model shop manual. That's the book that Ford wrote for and gave to the factory trained mechanics that worked at the Ford dealerships, and were responsible for fixing these cars when they broke. Ford also put all of the wiring/vacuum diagrams in another book that they also sent to the dealerships. These two are essential.
You will, no doubt, notice that there is no 1964 Mustang Shop Manual, instead, there is a 1964 Comet and Falcon Shop Manual with a 1964 Mustang Shop Manual Supplement. How that works is pretty simple. On all of the stuff on the Mustang that is the same as on the Falcon, like the engines, for example, you use the Comet and Falcon book, while all of the stuff on the Mustang that is different from the Falcon, that's in the Mustang book.
There are also books that have a whole bunch of good, general information about the Mustang. These aren't critical, but they are very interesting. TThe book by Kevin Marti about the tags is useful when you are trying to decode stuff on your car, like the rear axle ratio, or trying to figure out how this car actually came from the factory.
There is no one book that has everything that there is to know about these cars, or, any single book that includes no errors. And yes, that includes the shop manuals. Even they have some things in them that are wrong. Fortunately, the errors in the shop manuals are so trivial a person could use that book for years and never stumble across one of those mistakes. But, this is why I have hundreds of books and Ford publications. It has always been my opinion that knowing is better than not knowing. That's merely an opinion of mine, a values call, but, it is the values call that I made. So, the more information I have available, the better. You can not possibly have too many books, especially about something that you care about.


Subscribe to:
Posts (Atom)
